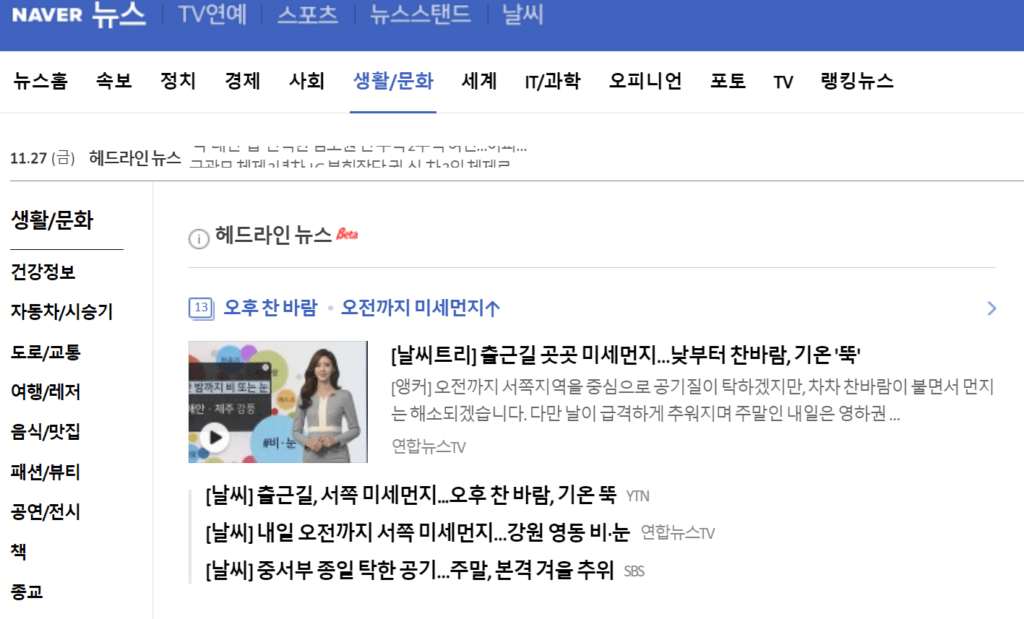
어느덧 수많은 브라우저 중에서 크롬의 점유율이 절대적으로 높아지는 시대가 되었습니다. 크롬을 제대로 사용하기 위해 크롬 확장 프로그램 stylus을 활용해 크롬 폰트 변경하는 방법을 살펴 보도록 하겠습니다.
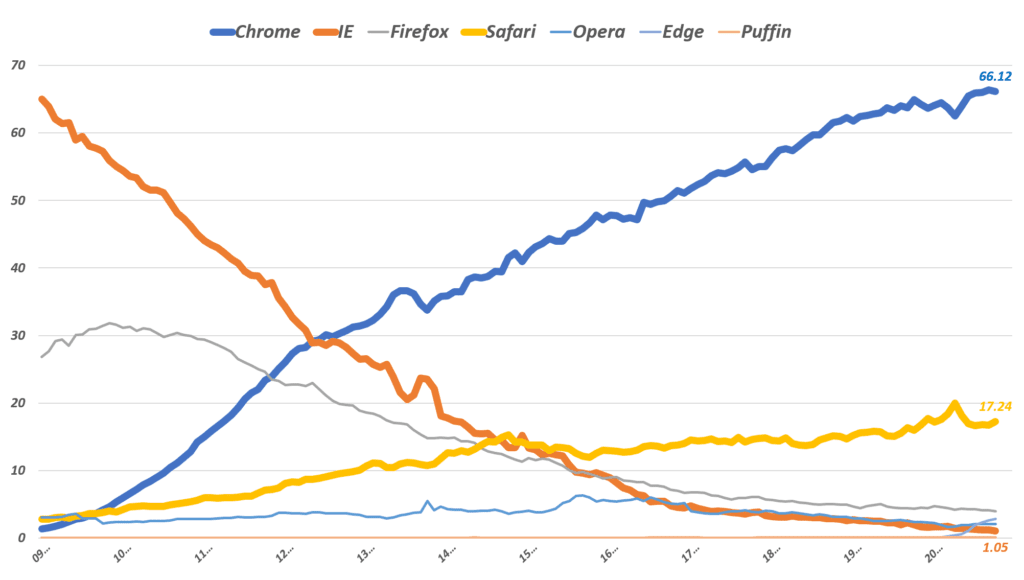
크롬을 처음 설치하게되면 기본 폰트는 윈도우즈10의 경우 운영체제 기본 폰트인 맑은고딕으로 설정됩니다.
맑은고딕은 마이크로소프트가 심혈을 기울여 만든 한글 폰트이므로 나름 만족도가 높은 폰트이지만 요즘에는 개성이 강한 다양한 글꼴들이 많이 등장했기 때문에 취향에 따라 마음에 드는 글꼴을 선택해 적용하는 경우도 많이 있습니다.
저의 경우는 모바일 시대에 맞추어 모바일에서도 최적으로 보인다는 나눔바른고딕을 적용하기로 했습니다. .
기본 크롬 폰트 변경 방법
크롬에서 폰트를 변경하는 방법은 여러가지가 있습니다.
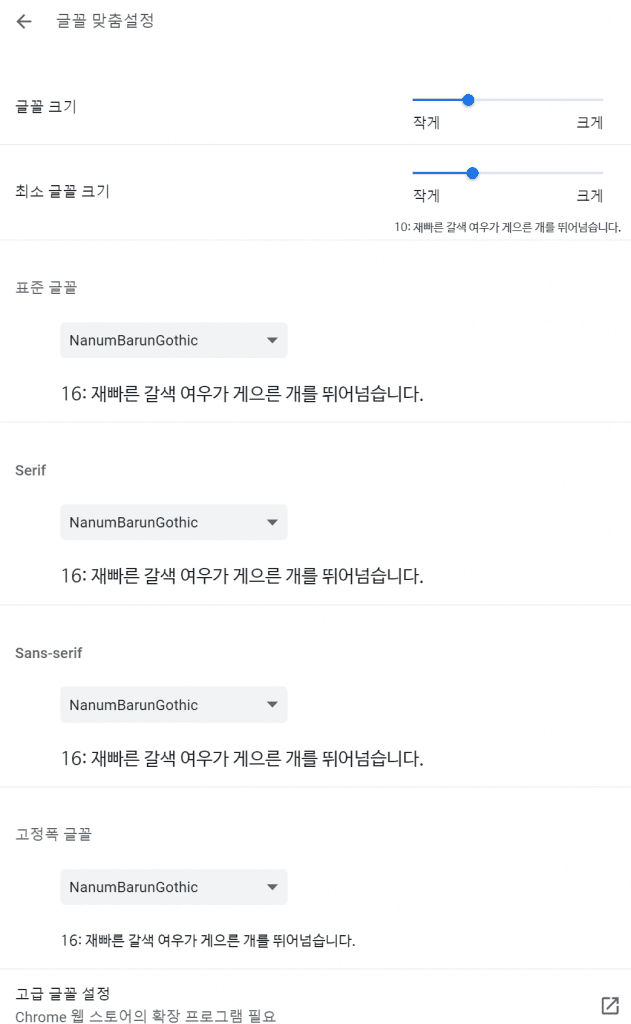
가장 간단히 할 수 있는 방법은 설정 – 모양 – 글꼴 맞춤 설정에서 글꼴 크기 및 다양한 글꼴을 설정해 주는 방법입니다.
그래서 글꼴 맞춤 설정에서 표준 글꼴, Serif, Sans-serif 그리고 고정폭 글꼴의 4가지를 변경할 수 있도록 되었 있는데요. 저는 이러한 글골을 전부 나눔바른고딕(NanumBarunGothic)으로 변경하였습니다.
- 표준 글꼴 : 웹페이지가 특정한 글꼴을 지정하지 않았을 경우 보여 줄 글꼴
- Serif : 웹페이지 글꼴을 Serif 계열의 글꼴을 적용 시 보여 줄 글꼴. Serif 글꼴은 획에 삐침이 있는 글꼴로 바탕이나 명조체와 같은 글꼴이 여기에 해당
- Sans-serif : 웹페이지 글꼴을 Sans-serif 계열의 글꼴을 적용 시 보여 줄 글꼴. Sans-serif 글꼴은 Serif와 달리 글자에 각 획에 삐침이 없는 글꼴로 고딕체가 이에 해당
그러면 아래와 같이 구글 크롬에서도 나눔바른고딕(NanumBarunGothic)로 웹 브라우징을 할 수 있습니다.
위에서 보여준 굴림에 비해서 상당히 가독성도 뛰어나고 보기에도 좋습니다. 한마디로 인터넷 서핑할 만하죠.
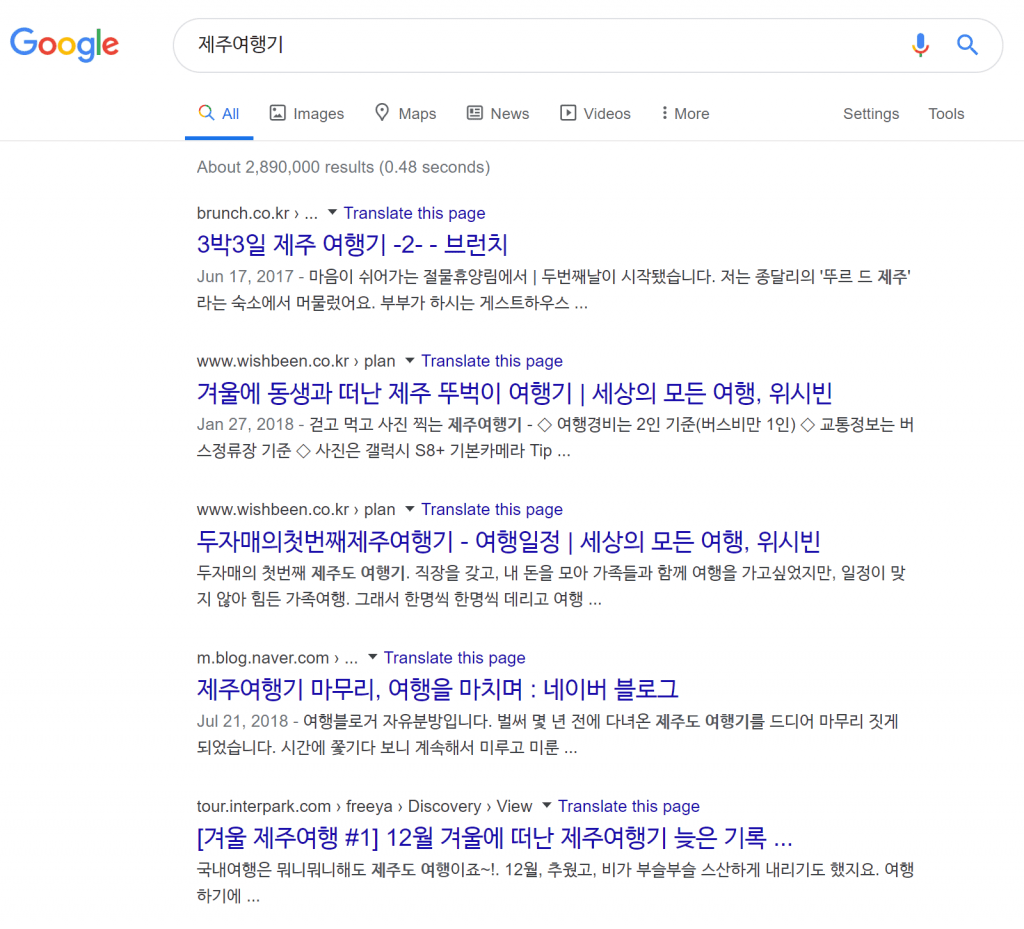
웹사이트에서 웹 스타일 지정 시 크롬 글꼴 설정은 무용지물
그러나 크롬에서 위와 같이 글꼴을 설정해도 그 사이트에서 특정 글꼴을 사용하도록 웹 스타일을 설정했다면 대부분의 브라우저는 사이트의 웹 스타일을 존중해 줍니다.
이는 크롬도 마찬가지입니다. 그렇기에 웹 사이트에서 웹 스타일을 정의해 놓았다면 크롬은 이를 존중해 크롬 변경 폰트가 아닌 사이트에서 설정한 폰트로 보여줍니다.
위에서 설명했듯이 요즘에는 개성이 강한 글꼴들이 많이 등장했기 때문에 이러한 개성 강한 글꼴을 이용해 웹 스타일을 정의한 경우도 많은데요. 이런 경우는 나름 웹 디자인에 신경을 썼기 때문에 오히려 심미성에서 더 좋을 수 있습니다.
문제는 오래전에 설정한 사이트들인데요. 예전에 사용했던 굴림체나 명조체와 같은 옛날 폰트를 기반으로 웹 스타일을 정의해 놓은 곳이 있습니가. 이런 사이트들은 방문해 글일 읽기에 부담스럽기까지 합니다.
이런 사이트 도는 웹 페이지가 생각보다 상당히 많죠. 예를들어 조금 오래된 티스토리 블러그 등에서 이런 페이지를 종종 만날 수 있습니다.
이런 경우를 대비해서 모든 웹 페이지를 브라우저에서 설정한 폰트로 보여주도록 강제하는 방법이 있습니다.
예를들어 인터넷 익스플러러에서는 브라우저 자체에서 웹 스타일을 무시하라는 옵션이 있죠. 이 옵션을 사용하면 모든 웹 페이지는 특정 폰트로만 보여집니다.
크롬에서 웹 스타일을 무시하는 방법 – 크롬 확장 프로그램 ‘stylus’ 사용
크롬은 자체적으로 웹 스타일을 무시하는 옵션을 제공하지 않습니다. 그렇기 때문에 웹 스타일을 무시하고 브라우저 설정 폰트로만 보고싶다면 크롬 확장 프로그램을 사용해야합니다.
이런 크롬 확장 프로그램으로 ‘stylus’가 있는데요. 여기서는 이 크롬 확장 프로그램 소개 및 사용방법을 설명하겠습니다.
크롬 확장 프로그램 stylus 추가
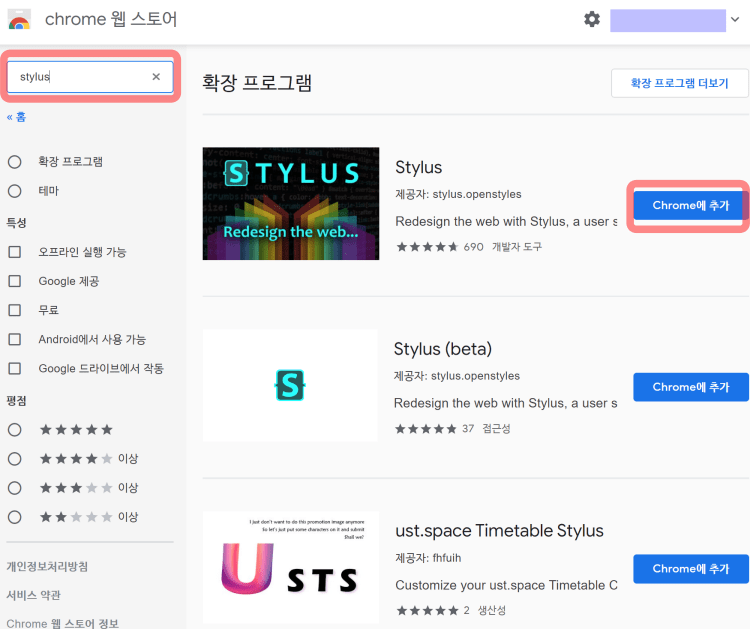
우선 chrome 웹 스토어로 이동해서 ‘stylus’를 검색해 stylus가 나오면 Chrome에 추가 버튼을 눌러 확장 프로그램에 추가합니다.
크롬 확장 프로그램 stylus 스타일 추가
‘stylus 확장 프로그램을 추가하면 크롬 맨 오른쪽 위에 S모양의 아이콘이 생기고 이곳에서 stylus 확장 프로그램의 스타일을 설정할 수 있습니다.
S모양의 아이콘을 누르면 Manage와 Option 등을 설정할 수 있는 버튼이 보이는 데요. 여기서 Manage를 누릅니다.

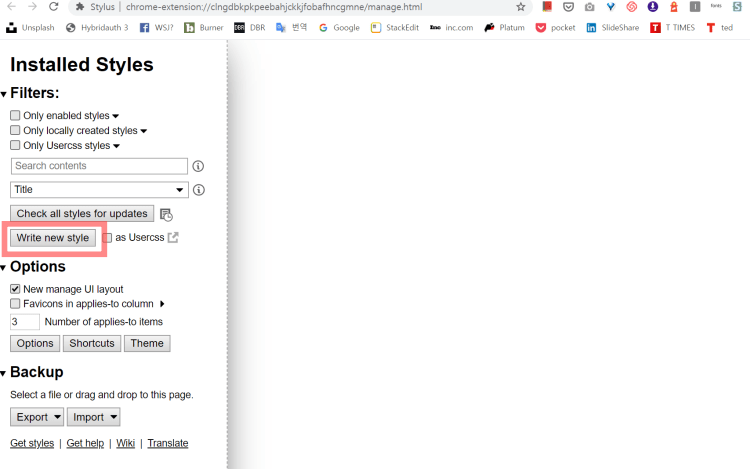
이제 여기서 새로운 스타일을 추가합니다. 여기서 whrite new style 버튼을 누릅니다.
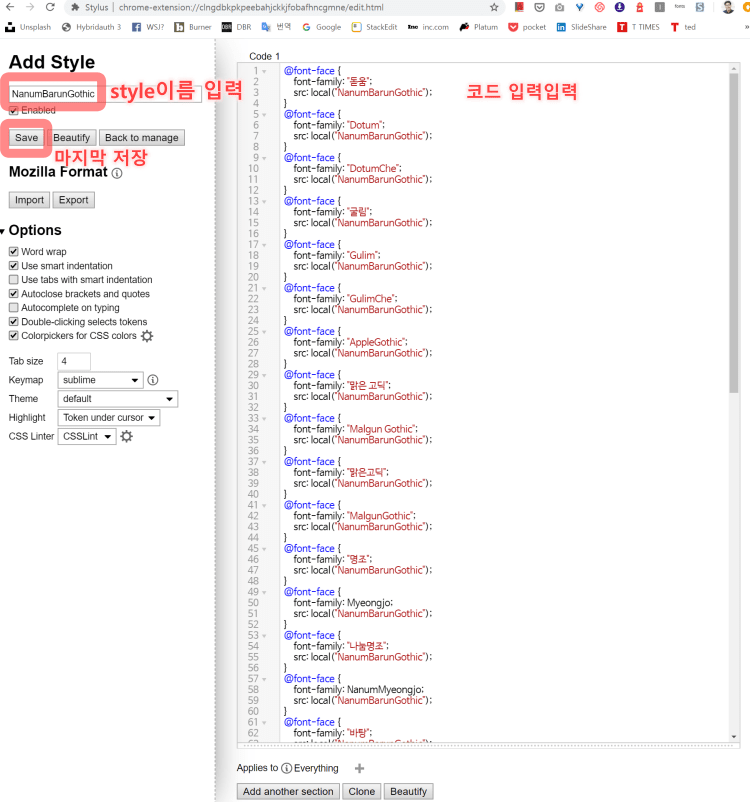
그러면 Add style 화면이 나오는데요. 원하는 스타일명을 입력합니다. 예를들어 NanumBarunGothic과 같은 이름을 입력합니다.
그리고 오른쪽 코드 입력 화면에 아래에 제시한 코드를 복사해 붙입니다. (만약 나눔바른고득체가 아닌 다름 폰트를 사용하고 싶다면 아래 코드에서 NanumBarunGothic 대신 원하는 폰트 이름으로 대체하면 됩니다.)그리고 저장합니다.
윈도우즈 및 맥용 폰트 적용 코드
먼저 윈도우즈에 설치된 구글 크롬에서 사용 가능한 코드입니다. 기본적으로 이 코드는 웹 페이지에서 설정된 폰트를 윈도우즈에 설치되어 있는 로컬 폰트를 사용토록 강제하는 것입니다.
아래 코드는 나눔바른고딕체를 적용토록 local의 NanumBarunGothic를 불러오도록 설정하고 있습니다. 만약 나눔고딕체를 적용한다면 Nanum Gothic으로 대체하면 됩니다.
윈도우즈용 코드
@font-face {
    font-family: "돋움";
    src: local("NanumBarunGothic");
}
@font-face {
    font-family: "Dotum";
    src: local("NanumBarunGothic");
}
@font-face {
    font-family: "DotumChe";
    src: local("NanumBarunGothic");
}
@font-face {
    font-family: "굴림";
    src: local("NanumBarunGothic");
}
@font-face {
    font-family: "Gulim";
    src: local("NanumBarunGothic");
}
@font-face {
    font-family: "GulimChe";
    src: local("NanumBarunGothic");
}
@font-face {
    font-family: "AppleGothic";
    src: local("NanumBarunGothic");
}
@font-face {
    font-family: "맑은 고딕";
    src: local("NanumBarunGothic");
}
@font-face {
    font-family: "Malgun Gothic";
    src: local("NanumBarunGothic");
}
@font-face {
    font-family: "맑은고딕";
    src: local("NanumBarunGothic");
}
@font-face {
    font-family: "MalgunGothic";
    src: local("NanumBarunGothic");
}
@font-face {
    font-family: "명조";
    src: local("NanumBarunGothic");
}
@font-face {
    font-family: Myeongjo;
    src: local("NanumBarunGothic");
}
@font-face {
    font-family: "나눔명조";
    src: local("NanumBarunGothic");
}
@font-face {
    font-family: NanumMyeongjo;
    src: local("NanumBarunGothic");
}
@font-face {
    font-family: "바탕";
    src: local("NanumBarunGothic");
}
@font-face {
    font-family: "Batang";
    src: local("NanumBarunGothic");
}
@font-face {
    font-family: "바탕체";
    src: local("NanumBarunGothic");
}
@font-face {
    font-family: "BatangChe";
    src: local("NanumBarunGothic");
}
@font-face {
    font-family: "NanumBarunGothic";
    src: local("NanumBarunGothic");
}
@font-face {
    font-family: "serif";
    src: local("NanumBarunGothic");
}
@font-face {
    font-family: "sans-serif";
    src: local("NanumBarunGothic");
}
@font-face {
    font-family: "Helvetica";
    src: local("NanumBarunGothic");
}
@font-face {
    font-family: "Tahoma";
    src: local("NanumBarunGothic");
}
@font-face {
    font-family: "Geneva";
    src: local("NanumBarunGothic");
}
@font-face {
    font-family: "Arial";
    src: local("NanumBarunGothic");
}
@font-face {
    font-family: "Apple SD Gothic Neo";
    src: local("NanumBarunGothic");
}
@font-face {
    font-family: "AppleSDGothicNeo-Regular";
    src: local("NanumBarunGothic");
}
@font-face {
    font-family: "Verdana";
    src: local("NanumBarunGothic");
}
@font-face {
    font-family: "Lato";
    src: local("NanumBarunGothic");
}
@font-face {
    font-family: "FontAwesome";
    src: local("NanumBarunGothic");
}
@font-face {
    font-family: "Helvetica Neue";
    src: local("NanumBarunGothic");
}Code language: PHP (php)
맥용 코드는 아래를 사용합니다.
@font-face {
    font-family: "돋움";
    src: local("NanumBarunGothic");
}
@font-face {
    font-family: "Dotum";
    src: local("NanumBarunGothic");
}
@font-face {
    font-family: "DotumChe";
    src: local("NanumBarunGothic");
}
@font-face {
    font-family: "굴림";
    src: local("NanumBarunGothic");
}
@font-face {
    font-family: "Gulim";
    src: local("NanumBarunGothic");
}
@font-face {
    font-family: "GulimChe";
    src: local("NanumBarunGothic");
}
@font-face {
    font-family: "AppleGothic";
    src: local("NanumBarunGothic");
}
@font-face {
    font-family: "맑은 고딕";
    src: local("NanumBarunGothic");
}
@font-face {
    font-family: "Malgun Gothic";
    src: local("NanumBarunGothic");
}
@font-face {
    font-family: "맑은고딕";
    src: local("NanumBarunGothic");
}
@font-face {
    font-family: "MalgunGothic";
    src: local("NanumBarunGothic");
}
@font-face {
    font-family: "명조";
    src: local("NanumBarunGothic");
}
@font-face {
    font-family: Myeongjo;
    src: local("NanumBarunGothic");
}
@font-face {
    font-family: "나눔명조";
    src: local("NanumBarunGothic");
}
@font-face {
    font-family: NanumMyeongjo;
    src: local("NanumBarunGothic");
}
@font-face {
    font-family: "바탕";
    src: local("NanumBarunGothic");
}
@font-face {
    font-family: "Batang";
    src: local("NanumBarunGothic");
}
@font-face {
    font-family: "바탕체";
    src: local("NanumBarunGothic");
}
@font-face {
    font-family: "BatangChe";
    src: local("NanumBarunGothic");
}
@font-face {
    font-family: "나눔고딕";
    src: local("NanumBarunGothic");
}
@font-face {
    font-family: "serif";
    src: local("NanumBarunGothic");
}
@font-face {
    font-family: "sans-serif";
    src: local("NanumBarunGothic");
}
@font-face {
    font-family: "Helvetica";
    src: local("NanumBarunGothic");
}
@font-face {
    font-family: "Tahoma";
    src: local("NanumBarunGothic");
}
@font-face {
    font-family: "Geneva";
    src: local("NanumBarunGothic");
}
@font-face {
    font-family: "Arial";
    src: local("NanumBarunGothic");
}
@font-face {
    font-family: "Apple SD Gothic Neo";
    src: local("NanumBarunGothic");
}
@font-face {
    font-family: "AppleSDGothicNeo-Regular";
    src: local("NanumBarunGothic");
}
@font-face {
    font-family: "Verdana";
    src: local("NanumBarunGothic");
}
@font-face {
    font-family: "Lato";
    src: local("NanumBarunGothic");
}
@font-face {
    font-family: "FontAwesome";
    src: local("NanumBarunGothic");
}
@font-face {
    font-family: "Helvetica Neue";
    src: local("NanumBarunGothic");
}Code language: PHP (php)
이렇게 크롬 확장 프로그램 stylus를 적용하면 어지간한 웹 페이지 폰트는 전부 크롬에서 설정한 폰트로 보여 집니다.
다른 대안, Force Custom Fonts 적용
위에서 크롬 확장 프로그램 stylus를 통해서 어느 정도 완벽하게 원하는 폰트로 사용 가능하다고 말씀드렸는데 댓글을 문의를 주신 분들이 많은 것을 보니 한계가 있나 봅니다.
syzor님이 알려 주신대로 stylus로도 해결이 안된다면 Force Custom Fonts를 사용하면 문제가 해결 된다고 합니다. 아래 링크를 통해서 Force Custom Fonts 확장 프로그램을 설치해 보세요.
이 확장 프로그램에서도 css를 잘 다룰 수 있다면 stylus를 사용하라고 권고하고 있기는 합니다. 아무래도 우리나라 웹사이트들 중에서 HTML 표준을 지키지 않고 독자적인 코드를 사용하는 곳들이 있다 보니 stylus css 명령이 제대로 먹히지 않나 생각해 봤습니다.
저는 Force Custom Fonts 추가 후 아래와 같이 기본 세팅만 했는데요.
Default/Chinese, Latin/English, Non_CJK_En 세군데만 폰트 세팅해주면 기본적으로 작동하는 것 같습니다. 외국 프로그램이라 한글 폰트도 전부 영문으로만 나옵니다.
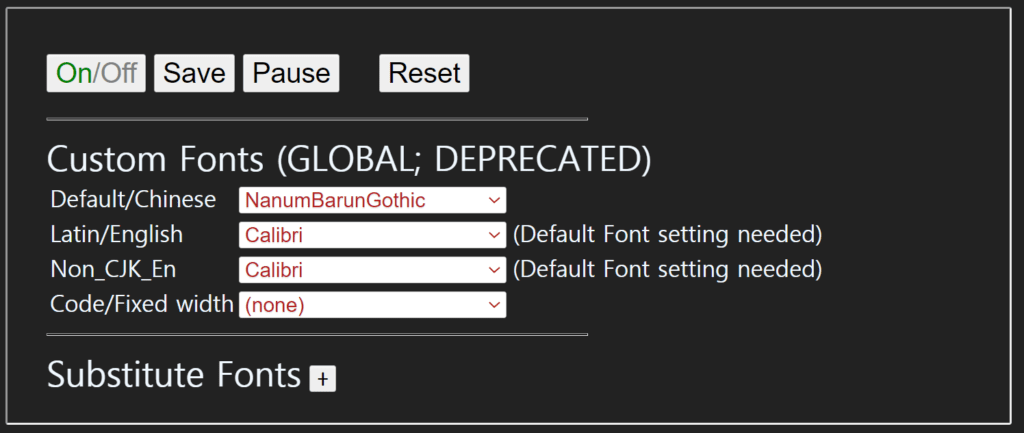
위 그림처럼 세팅 후 저장(Save)하니 나눔바른고딕체로 변경이 되었습니다. 네이버 등 안된다고 몇 분이 말씀해 주신 사이트들이 이 확장 프로그램으로 해결이 되는 것을 확인했습니다.
